contact@wix.com
+123-456-789
© 2035 by The Clinic.Powered and secured by Wix
ELITE DANGEROUS FOR DUMB NOOBS
This is a guide for how to play the PC GAME "Elite Dangerous". I've striven to make it as basic as possible. If anything is unclear, please let me know via the contact link at the bottom of this page.
If you want to know my thinking behind this guide, please scroll down to SECTION E01. Otherwise, starting from here is how to get started in the game
SECTION A01
TIPS FOR GETTING THROUGH THE FIRST TUTORIAL (and other general tips)
ONE
During the initial tutorial, if you’re having trouble using the mouse accurately to roll, pitch and yaw, i recommend mapping keyboard keys to do this
(you’ll probably find better keys than what I have here, but these ones work for me)
Esc - options - Controls - ship controls - flight rotation:
-
Roll left = A
-
Roll right = D
-
Pitch up = numberpad 8
-
Pitch down = numberpad 5
-
Yaw left = numberpad 4
-
Yaw right = numberpad 6
Making these key mappings doesn't prevent using the mouse for the same purpose. I use the keyboard for this most of the time, but use the mouse when I'm in combat
TWO
Since I usually steer the ship using the keyboard, one frequent problem I have is accidentally knocking the mouse and then having to get it dead centre again to stop the ship rotating or turning. The quickest way to stop the movement is double clicking the middle mouse button (MMB) (pressing the middle mouse button once toggles headlook mode, so if you find that moving the mouse moves your camera view without turning the ship, press the MMB once to turn headlook off)
THREE
In combat, I suggest you try turning on night-vision and see if it helps navigating obstacles and finding your target
To map a key - Esc - options - controls - ship controls - miscellaneous - night vision = End
FOUR
I recommend that you map a key to 50% throttle, which give you the fastest turn rate
Esc - options - controls - ship controls - flight throttle - set speed to 50% (not “-50%”) - I use the “[” key
FIVE
If you want to replay the first tutorial
-
Open the right hand interface panel (default keybinding “4”)
-
Q and E to select the tab to the left of “modules”
-
Left, right, up, down arrows to select “training”
-
Spacebar twice
-
Right arrow
-
Spacebar
-
To exit the tutorial:
-
Esc
-
Exit
-
Cancel simulation
SIX
After the tutorial. Ship selection: I recommend taking the “all rounder” Sidewinder, unless you’re particularly keen to drive a buggy on a planet straight away
SEVEN
Once you are in the game universe proper, it's easy to find yourself somewhere that you don't want to be (and you don't know how to get back to where you do want to be). Here's a couple of options:
- self-destruct. Certainly when you are in your beginners ship there is no harm in trying a self destruct. You'll be issued a new ship and find yourself back in the last station you docked at
- if you are not stationary, press X
- if your speed is still around 30km/s, you are in super-cruise - press J to exit
- 4
- Q,E to highlight "ship"
- up arrow to highlight "functions"
- right arrow once
- press down arrow until "self destruct" is highlighted
- spacebar, etc
- or you can start again in the beginner area by "clearing save" (deleting your character)
- when you run the game, and you're on this screen:

- select "options"
- then select "clear save", etc
SECTION A02
THE FIRST MISSION - "A NEW OPPORTUNITY"
In this section I will give instructions based on my own keybindings. See SECTION B04 for a reference to what each key represents
- something to keep in mind at all times is your fuel level
- its in the bottom right of the screen
- generally when it gets down to 1/4 to 1/3 full you want to look for a space station to fill up at
When you complete the tutorial you will have a sidewinder ship, and 1000 credits. You will also have a mission “a new opportunity”. Here’s how to complete it
- Open the “external interface panel” (press "1")
- Press “E” until you have the “transactions” tab selected
- Press right-arrow and you should have “a new opportunity” selected
- Press spacebar
- Right-arrow to highlight the icon that looks like this

- Press spacebar
- the star system that you're aiming for is indicated by a blue double circle like this

or a blue circle like this

- click and hold on the white dot above the blue circle / the yellow? dot in the blue circle
- you'll get this symbol above it

and see a message "route plotted" in the bottom right of the screen
- you'll find that repeatedly doing this will toggle "route plotted" on and off
- toggle so that the route is plotted
- You’ve now targeted the destination system for this mission
- Press backspace twice
- You now need to leave the space station - but it’s good practice to always check your fuel, repair status and ammo at this point
- Using the arrow keys, highlight in turn the rain-drop, wrench and bullet in the centre of the screen

- These will indicate whether you need to re-supply
(if it says "unavailable" it just means that you can't access fuel / repairs / ammo at this station, so just move on)
- Press spacebar to purchase any of them
- Now use the arrow keys to highlight Auto Launch
- Press spacebar
- Once the launch is completed, you can continue
- Before you can jump to the next star, you need to move far enough away from the space station
- You’ll see in the bottom right corner of the screen there is a light on next to “mass locked”
- Hold down W to accelerate
( go to SECTION B06 for an explanation of the throttle display)
- When the “mass locked” light goes out you can continue
- As explained in SECTION B03, using the compass, roll and pitch, point your ship at the dot on the compass (use yaw for fine direction adjustment, num4 and num6)
- Aim your ship directly at your target, which looks like this

- Jump to the targeted star ( J )
- Set throttle to maximum (hold down the “W” key)
- After arriving at next star, press 1
- Using up and down arrows highlight the line with blue text
- Press spacebar
- Use right / left arrows to highlight “supercruise assist”
- Spacebar
- Now we are going to move a safe distance from the local star, before we point towards the target - this avoids the risk of taking heat damage from passing too close to the star
- hold down num8 until the star is no longer visible to you
- hold down W to set throttle to maximum
- wait until your speed is at least 4.00c
- now use A, D, num5 and num8 to aim directly at your target
- "supercruise assist" will take over and take you to your target
( if supercruise assist isn't working, go to SECTION B07 )
- once you arrive at the space station, full throttle (hold down W) until you are within 7.5km (see middle of screen), then press X
- 1, E to select contacts, right arrow to select “request docking”, then spacebar
- (Occasionally a docking request is not granted. If this happens multiple times, the first thing to try is to move more than 7.5km from the station, enter supercruise (press K), loop around and come back to the station (start again from the start of this section for instructions))
- press backspace, then wait while your ship docks with the space station automatically
- use up and down arrow keys to select “starport services”
- mouse and LMB to
- select "mission board"
- select "mission board" again
- "completed missions"
- "a new opportunity"
- select the yellow box under "choose one reward"
- you should now have 11,000 credits (to check this press 4, use Q and E to select the tab to the left of “modules” - balance is shown in the bottom left)
- backspace until you get back to the cockpit
- now go to SECTION A03
SECTION A03
In this section I will give instructions based on my own keybindings. See SECTION B04 for a reference to what each key represents
- if you’re after suggestions on where to go from here, I’d suggest trying a transportation mission
- when you are docked in a space station:
- highlight “starport services” with arrow keys
- spacebar
- use mouse and LMB (left mouse button) to select "mission board"
- select "mission board" again
- select “transportation”
- find a mission with a reward less than 20,000 credits
- select the mission with LMB
- click on the icon that looks like this
- the star system that you're aiming for is indicated by a blue double circle like this
- or a blue circle like this
- click and hold on the white dot above the blue circle / the yellow? dot in the blue circle
- you'll get this symbol above it

and see a message "route plotted" in the bottom right of the screen, along with either "next jump" or "<number of> jumps"
- you'll find that repeatedly doing this will toggle "route plotted" on and off
- (there are two other possibilities
- if you get a message "plotting error" - this means the mission is unreachable
- another possibility is that the mission destination is in the current star system - in this case
clicking and holding on the dot does nothing (make a note of this for future reference )
- (to give you an idea what the number of jumps represents, someone that has practiced for a while will probably take an average of 55 seconds to do each hyperspace jump - so you probably don't want to do a mission that requires more than 5 jumps - at this stage anyway - so choose another mission if there are too many jumps required)
- if you want to choose another mission, press backspace until you're back to the list of missions, choose another one, and start again from the start of this section
- toggle so that the route is plotted
- You’ve now targeted the destination system for this mission
- Press backspace twice then click on “accept mission” (then possibly accept mission again)
- press backspace until you’re back in your cockpit
- now before leaving the starport, check that you don't need fuel, repairs or ammo
- use the arrow keys to select, in turn, the water drop, wrench, and bullet icons
(if it says "unavailable" it just means that you can't access fuel / repairs / ammo at this station, so just move on)
- if it says you need any, press spacebar and it will change to "maximum fuel" , "fully repaired", etc (your starter weapons don't need ammo)
- select auto-launch to leave the spaceport (with arrows and spacebar)
- Once the launch is completed, you can continue
- before you can jump to the next star, you need to move far enough away from the space station
- you’ll see in the bottom right corner of the screen there is a light on next to “mass locked”
- hold down W to accelerate
( go to SECTION B06 for an explanation of the throttle display)
- when the “mass locked” light goes out you can continue
- at this point, if the mission destination is in the current star system (when setting route above, you wouldn't have got a "route plotted" message) then proceed to SECTION A19
- As explained in SECTION B03, using the compass, roll and pitch, point your ship at the dot on the compass (use yaw for fine direction adjustment, num4 and num6) - the target looks like this:

- now press J to jump to the target star (this will take at least 20 seconds)
- repeat this process if getting to your destination requires 2 or more jumps
- you know that you are not yet at your destination if the "compass" is displayed to the top left of the central radar
- if the compass is not displayed, proceed to SECTION A19
SECTION A04
In this section I will give instructions based on my own keybindings. See SECTION B04 for a reference to what each key represents
- If you need specific instructions on how to do a task in this section, please play through SECTION A03 to learn how
- When you've done a few transport missions, then you might want to move on to combat missions. You can make a lot more money from combat missions than from transport - but until you get a better class of ship, you may find using lasers and cannons to be challenging. If your ship isn't manoeuvrable enough, it makes it hard to hit the other guy. My recommendation is to start by using seeker missiles. To buy the lowest level seeker missile rack will set you back 72,600 credits, plus about 10k to buy missiles. So if you want to go this way, keep doing transportation missions until you've saved up this much.

So you have the money saved up. The sort of money you can earn by doing combat missions with the ship that we're talking about is from 85k to 200k per mission - plus bounties which might be from nothing to about 450k per mission.
The plan is to equip your ship with at least one 1B Seeker Missile Rack. If you have enough money, buy two. The only complication when you use two is that your current power plant isn't able to power the 2 missile racks and everything else at the same time. So we leave our cargo hatch powered down all the time. Sometimes I still have issues, so in that case I power down my "advanced docking computer" before going into combat.
Here we go:
First of all you need to find a space station where you can buy a missile rack. In my experience most space stations sell them. If you're currently docked at a space station go to SECTION A06. Otherwise go to SECTION A15
SECTION A05
this section is one segment of "how to do a combat mission", which starts at SECTION A04
- we are looking for an easy level combat mission and we're going to go look for one in another star system
- (if you're currently in a space station, backspace to get to the cockpit, auto launch, and fly away from the station until you're no longer mass locked)
- to start with we will write down the name of the system we are currently in
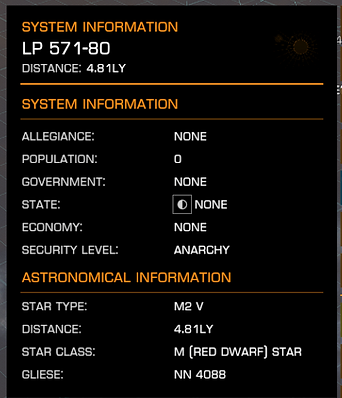
- the bottom left of the screen will look something like this

OR THIS

- the star system names in these examples are "LP 571-80" and "ALRAI SECTOR JH-V B2-6"
- write down or otherwise record the name of your current star system
- now we will look at the other star systems in our neighbourhood
- press 1
- use arrow keys to highlight this cross (if it's there)

- use the arrow keys to highlight the top item in the list of locations
- press up arrow
- you'll see the bottom of the list of locations - anything with this symbol is a star system

- anything above the star systems in the list is located within your current star system
- highlight the top star system
- spacebar
- amongst the information on this screen is "security" (level). A star system with security level "anarchy" will have no space stations. The other options are "low security", "medium security" and "high security". These will all have space stations
- if all of the systems in this list are "anarchy" type, write down or otherwise record all of these system names (identified as uninhabited) and go to SECTION A09
- if you find a non-anarchy star system in the list, highlight the "lock destination" button
- spacebar
- use the compass to point your ship at the target star system
- J
- set throttle to max
- (continue after jumping to the next star system)
- repeat this process if getting to your destination requires 2 or more jumps
- you know that you are not yet at your destination if the "compass" is displayed to the top left of the central radar
- if the compass is not displayed go to SECTION A14
SECTION A06
this section is one segment of "how to do a combat mission", which starts at SECTION A04
( If after following these directions you find there aren't any missile racks available for purchase at this station, go to SECTION A16 and travel to another star system in order to find another space station where you can purchase one)
- starport services
- (then using mouse)
- outfitting (3 hexagons)
- hardpoints
- pulse laser
- replace module
- missiles
- on the left hand side are weapons that are in stock or in storage. If they are striped (as shown on the right here) it means they are unavailable (or that you can't use them for one of a variety of other reasons)

- buy and equip, then wait for animation to complete
- now we need to add it to a fire group
- backspace
- OK
- 4
- press E until "fire groups" is highlighted
- use arrow keys to select the circle in column A next to Seeker Missile Rack
- press spacebar until there's a "1" in that circle
- backspace
- backspace
- use arrow keys to highlight "ammunition" icon (looks like a bullet)
- spacebar to restock
- if you have 2 missile launchers, disable your cargo hatch so that your launchers have enough power to operate
- 4
- use Q,E to select "modules"
- arrow keys to to highlight cargo hatch
- spacebar
- if it says active, press spacebar
- backspace
Now to find a combat mission
- starport services
- (using mouse)
- mission board
- mission board
- combat
- find a mission with a reward of less that 150,000 credits. A pirates or terrorist mission is ideal. Smugglers are ok too - you will become "wanted" after killing a smuggler, but it seems to be a minor crime that will just cost you a few thousand credits - no other consequences
- (if there isn't a mission like this, we will try at a different space station, go to SECTION A05)
- (using mouse)
- click on the mission
- click galaxy map icon (refer to SECTION A03 for more details)
- hold down space bar, and verify that its not too far away
- backspace
- backspace
- (if the mission was too far away, choose another mission - repeat until you find one that's close enough)
- accept mission
- backspace until you are back in the cockpit
- auto launch
- go to SECTION A08
SECTION A07
this section is one segment of "how to do a combat mission", which starts at SECTION A04
Now to find a combat mission
- starport services
- (then using mouse)
- mission board
- mission board
- combat
- find a mission with a reward of less that 150,000 credits. A pirates or terrorist mission is ideal (smugglers are ok too - you will become "wanted" after killing a smuggler, but it seems to be a minor crime that will just cost you a few thousand credits - no other consequences)
- (if there isn't a mission like this, we will try at a different space station: backspace to the cockpit, leave the station, fly away until non-mass locked, and go to SECTION A05
- (then using mouse)
- click on the mission
- click galaxy map icon
- as shown in SECTION A03 plot a route to the mission target
- backspace
- backspace
- (if the mission was too far away, choose another mission - repeat until you find one that's close enough)
- accept mission
- backspace until your are back in the cockpit
- auto launch
- go to SECTION A08
SECTION A08
this section is one segment of "how to do a combat mission", which starts at SECTION A04
- NOTE: in my experience, once we get to our destination system, there's a reasonably high chance that the pirate / terrorist / smuggler we are after will try to "interdict" us and pull us out of supercruise
- if this happens, the easiest thing to do is press X, then go to SECTION A20
- at this point I recommend turning your sound on, or turning up the volume so you can hear the game sounds clearly - this will assist you during combat
- after launch is finished, set throttle to max to move you away from the starport
- wait until the "mass locked" light goes out
- use the compass to point your ship at the target star system
- J
- (continue after jumping to the next star system)
- repeat this process if getting to your destination requires 2 or more jumps
- (you know that you are not yet at your destination if the "compass" is displayed to the top left of the central radar
if the compass is not displayed, proceed to the next step below)
- 1
- use Q/E to select the navigation tab
- near the top of the list should be "nav beacon"
- highlight it using arrow keys
- spacebar
- highlight "supercruise assist"
- spacebar
- backspace
- aim ship at target (careful of getting too close to the star - see SECTION B02 for instructions)
- (after arriving)
- 1
- Q,E to select "contacts"
- arrow keys to select "navigation beacon"
- spacebar
- backspace
- on the central radar you'll see a triangle or square with brackets around it like this

- experiment with A, D, numpad8 and numpad5 and see how this target moves as you turn
- to make it confusing there is a "nav beacon" which is marked with a circle, and a "navigation beacon" which is marked by < > brackets. You are looking for the brackets, like the one on the left:

- when you are pointed towards it, the display in the bottom left of the screen will show

- once the scanning message has gone we can move on
- (you may not see the scanning message, it is easy to miss. If you are less than 2km from the beacon (the one on the left not the one on the right) aimed directly at it, and you don't see the scanning message, then the scan has already finished and you can move on)
- press K
- throttle up to max
- (if you have 2 missile launchers and have had issues with missile racks shutting down due to low power, this is where you disable your Advanced Docking Computer - go to SECTION A17
- you should quickly see a message in the top right of the screen "discovered mission related signal source"
- press 1
- Q,E to select navigation tab
- use arrow keys to highlight this cross (if it's there)
- spacebar
- using the arrow keys, scroll down the list under the heading "location" - you are looking for blue text "mission target" like this

- there will likely be multiple lines with blue text - "mission: target" is what you want
- highlight this line
- spacebar
- use arrows to highlight "supercruise assist"
- spacebar
- backspace
- turn your ship to align with target
- (supercruise assist takes you to the combat target)
- go to SECTION A20
SECTION A09
this section is one segment of "how to do a combat mission", which starts at SECTION A04
- continuing the hunt for an inhabited star system, in order to find an easy level combat mission
- press 1
- arrow keys to highlight galaxy map
- spacebar
- lets familiarize ourselves with the galaxy map screen
- the system you are currently in is indicated by this orange arrow above it
- click and hold the LMB in an empty space, and try moving the mouse up, down, left, right
- you'll see that you can see other star systems in your vicinity, and the hyperspace links between them
- try clicking on the dots that link directly to your current star system
- not all dots are selectable, but when you click on most dots a box like this will come up
- once again we are looking for a non-anarchy system
- when you've found one, click and hold on that dot until a message comes up "route plotted" (Try it multiple times. You'll see that it toggles between "route plotted" and "no route set")
- when you have a route plotted, we'll head there
- use the compass to point your ship at the target star system
- J
- set throttle to max
- (continue after jumping to the next star system)
- repeat this process if getting to your destination requires 2 or more jumps
- you know that you are not yet at your destination if the "compass" is displayed to the top left of the central radar
if the compass is not displayed go to SECTION A14
SECTION A10
this section is one segment of "how to do a combat mission", which starts at SECTION A04
- continuing the hunt for an inhabited star system, in order to find a combat mission
- press 1
- arrow keys to highlight galaxy map
- spacebar
- lets familiarize ourselves with the galaxy map screen
- the system you are currently in is indicated by this orange arrow above it
- click and hold the LMB in an empty space, and try moving the mouse up, down, left, right
- you'll find that you can see other star systems in your vicinity, and the hyperspace links between them
- try clicking on the dots that link directly to your current star system
- not all dots are selectable, but when you click on most dots a box like this will come up
- once again we are looking for a non-anarchy system
- when you've found one, click and hold on that dot until a message comes up "route plotted" (Try it multiple times. You'll see that it toggles between "route plotted" and "no route set")
- when you have a route plotted, we'll head there
- use the compass to point your ship at the target star system
- J
- set throttle to max
- (continue after jumping to the next star system)
- repeat this process if getting to your destination requires 2 or more jumps
- you know that you are not yet at your destination if the "compass" is displayed to the top left of the central radar
- if the compass is not displayed go to SECTION A14
SECTION A11
this section is one segment of "how to do a combat mission", which starts at SECTION A04
- continuing the hunt for an inhabited star system
- press 1
- arrow keys to highlight galaxy map
- spacebar
- lets familiarize ourselves with the galaxy map screen
- the system you are currently in is indicated by this orange arrow above it
- click and hold the LMB in an empty space, and try moving the mouse up, down, left, right
- you'll find that you can see other star systems in your vicinity, and the hyperspace links between them
- try clicking on the dots that link directly to your current star system
- not all dots are selectable, but when you click on most dots a box like this will come up
- once again we are looking for a non-anarchy system
- when you've found one, click and hold on that dot until a message comes up "route plotted" (Try it multiple times. You'll see that it toggles between "route plotted" and "no route set")
- when you have a route plotted, we'll head there
- use the compass to point your ship at the target star system
- (as always be careful if you are near your local star - see SECTION B01 )
- J
- set throttle to max
- (continue after jumping to the next star system)
- repeat this process if getting to your destination requires 2 or more jumps
- you know that you are not yet at your destination if the "compass" is displayed to the top left of the central radar
- if the compass is not displayed go to SECTION A15
SECTION A12
this section is one segment of "how to do a combat mission", which starts at SECTION A04
- so we are looking for an easy combat mission, and we need to go to another star system to find one
- to start with we will write down the name of the system we are currently in
- the bottom left of the screen will look something like this
or this
- the star system names in these examples are "LP 571-80" and "ALRAI SECTOR JH-V B2-6"
- write down or otherwise record the name of your current star system
- now we will look at the other star systems in our neighbourhood
- press 1
- use arrow keys to highlight this cross (if it's there)
- spacebar
- use the arrow keys to highlight the top item in the list of locations
- press up arrow
- you'll see the bottom of the list of locations - anything with this symbol is a star system
- anything above the star systems in the list is located within your current star system
- highlight the top star system
- spacebar
- amongst the information on this screen is "security" (level). A star system with security level "anarchy" will have no space stations. The other options are "low security", "medium security" and "high security". These will all have space stations
- if you find a non-anarchy star system in the list, highlight the "lock destination" button
- spacebar
- (if all of the systems in this list are "anarchy" type, write down or otherwise record all of these system names (identified as uninhabited) and go to SECTION A10 )
- use the compass to point your ship at the target star system
- J
- set throttle to max
- (continue after jumping to the next star system)
- repeat this process if getting to your destination requires 2 or more jumps
- you know that you are not yet at your destination if the "compass" is displayed to the top left of the central radar
- if the compass is not displayed go to SECTION A14
SECTION A13
this section is one segment of "how to do a combat mission", which starts at SECTION A04
- so you fought in a combat mission, and got destroyed
- you'll see a message "ship destroyed"
- use mouse to click "continue"
- click "continue" again
- redeploy
- "confirm and redeploy"
- you'll now be back in a space station with your original ship (type) and the missile launcher(s)
- we will discard the combat mission (we'll try to find something easier)
- press "1"
- E to select transactions
- arrow keys to highlight the mission
- spacebar
- right arrow to highlight "discard"
- spacebar
- now go to SECTION A07
SECTION A14
this section is one segment of "how to do a combat mission", which starts at SECTION A04
- so you are in space, and you are looking for an easy level combat mission
- if you are near the star, turn your ship so it's facing away from the star
- press X
- if your speed goes down to zero, then press K
- increase throttle to max
- once you are in supercruise, press X
- press 1
- arrow keys to highlight the icon under "set filters"
- spacebar
- select stations, and de-select all other options
- backspace
- arrows to highlight the top station (not the nav beacon)
- if the only option in the list is "nav beacon" it means you are in an uninhabited system. Go to SECTION A05
- spacebar
- arrows to highlight "supercruise assist"
- spacebar
- backspace x 2
- (as always, be cautious if you are close to the sun/star - go to SECTION B02 if you're not sure what to do)
- turn your ship so you're pointing directly at your target
- supercruise assist will take you to the station
- once you arrive at the space station, full throttle (hold down W) until you are within 7.5km (see middle of screen), then press X
- 1, E to select contacts, right arrow to select “request docking”, then spacebar
- (Occasionally a docking request is not granted. If this happens multiple times, the first thing to try is to move more than 7.5km from the station, enter supercruise (press K), loop around and come back to the station (start again from the start of this section for instructions) - if you are still denied, move more than 7.5km from the station and go to SECTION A05 )
- once you are docked, go to SECTION A07
SECTION A15
this section is one segment of "how to do a combat mission", which starts at SECTION A04
- so you are in space, and you are looking for a space station to buy missile racks
- press 1
- arrow keys to highlight the icon under "set filters"
- spacebar
- select stations and de-select all other options
- backspace
- arrows to highlight the top station in the "location" list (not the nav beacon)
- if the only option in the list is "nav beacon" it means you are in an uninhabited system - go to SECTION A16
- spacebar
- arrows to highlight "supercruise assist"
- spacebar
- backspace x 2
- (as always, be cautious if you are close to the sun/star - go to SECTION B02 if you're not sure what to do)
- if you're not close to the star, turn your ship so you're pointing directly at your target
- supercruise assist will take you to the station
- once you arrive at the space station, full throttle (hold down W) until you are within 7.5km (see middle of screen), then press X
- 1, E to select contacts, right arrow to select “request docking”, then spacebar
- (Occasionally a docking request is not granted. If this happens multiple times, the first thing to try is to move more than 7.5km from the station, enter supercruise (press K), loop around and come back to the station (start again from the start of this section for instructions). If you are still denied, fly to a different star system - SECTION A16 ))
- once you are docked, go to SECTION A06
SECTION A16
this section is one segment of "how to do a combat mission", which starts at SECTION A04
- so we are looking to buy missile racks, and we need to go to another star system to get them
- first of all, press X
- now to start with we will write down the name of the system we are currently in
- the bottom left of the screen will look something like this
or this
- the star system names in these examples are "LP 571-80" and "ALRAI SECTOR JH-V B2-6"
- write down or otherwise record the name of your current star system
- now we will look at the other star systems in our neighbourhood
- press 1
- use Q, E to select "navigation" tab
- use arrow keys to highlight this cross (if it's there)
- spacebar
- use the arrow keys to highlight the top item in the list of locations
- press up arrow
- you'll see the bottom of the list of locations - anything with this symbol is a star system

- anything above the star systems in the list is located within your current star system
- highlight the top star system
- spacebar
- amongst the information on this screen is "security" (level). A star system with security level "anarchy" will have no space stations. The other options are "low security", "medium security" and "high security". These will all have space stations
- if you find a non-anarchy star system in the list, highlight the "lock destination" button
- spacebar
- (if all of the systems in this list are "anarchy" type, write down or otherwise record all of these system names (identified as uninhabited) and go to SECTION A11 )
- use the compass to point your ship at the target star system
- if your local star is large on your screen, go to SECTION B01
- press J
- set throttle to max
- (continue after jumping to the next star system)
- repeat this process if getting to your destination requires 2 or more jumps
- you know that you are not yet at your destination if the "compass" is displayed to the top left of the central radar
- if the compass is not displayed go to SECTION A15
SECTION A17
this section is one segment of "how to do a combat mission", which starts at SECTION A04
- how to disable your Advanced Docking Computer
- press 4
- press E until "modules" tab is selected
- use up/down arrow keys to highlight "advanced docking computer"
- spacebar
- if the "active" option is enabled press spacebar
- the advanced docking computer is now disabled
- remember after combat to do these steps again to enable the docking computer
- now continue with SECTION A08
SECTION A18
this section is one segment of "how to do a combat mission", which starts at SECTION A04
- so you are in combat, and you've run out of ammo - time to run
- press U to retract hardpoints (weapons)
- press K
- set throttle to 50% by pressing "["
- there will be a delay entering supercruise, so while it is showing "charging" it won't hurt to zig-zag your ship so that it's harder for the enemy to hit you - using A, D, num5 and num8
- once charging has finished, increase throttle to max and you'll enter supercruise
- press X
- once speed is down to about 30km/s, press K
- with this being a noob's guide, I'm going to go with the safest option now: we will abandon the mission and go and find another combat mission. Especially if you only have one missile launcher - what we are aiming to do at this stage is just make enough money so we can buy a second launcher
- press 1
- press E until "transactions" is selected
- use arrow keys to highlight the mission
- spacebar
- use right arrow key to highlight "abandon"
- spacebar
- arrow keys to highlight "confirm"
- spacebar
- backspace
- go to SECTION A14 and we will try again with a different mission
SECTION A19
this section is one segment of "how to do a transportation mission", which starts at SECTION A03
- press 1
- in the navigation tab, use right arrow to highlight the top of the list, then down arrow until you find a line with blue text
- highlight that line
- spacebar
- highlight supercruise-assist (using right / left arrows and spacebar)
- spacebar
- backspace
- Now we are going to move a safe distance from the local star, before we point towards the target - this avoids the risk of taking heat damage from passing too close to the star
- hold down num8 until the star is no longer visible to you
- hold down W to set throttle to maximum
- wait until your speed is at least 4.00c
- now use A, D, num5 and num8 to aim directly at your target, which looks like this
- "supercruise assist" will take over and take you to your target
- once you arrive at the space station, full throttle (hold down W) until you are within 7.5km (see middle of screen), then press X
- press 1
- press E until "contacts" is selected, right arrow to select “request docking”, then spacebar
- press backspace, then wait while your ship docks with the space station automatically
- (Occasionally a docking request is not granted. If this happens multiple times, the first thing to try is to move more than 7.5km from the station, enter supercruise (press K), loop around and come back to the station (start again from the start of this section for instructions))
- "starport services" should be highlighted, otherwise use up and down arrow keys to highlight it
- spacebar
- use mouse and LMB to select "mission board"
- select “mission board” again
- "completed missions"
- there should just be one mission to click on
- under "choose one reward" there will be 3 yellow boxes - click on the left hand box
- backspace until you get back to the cockpit
- try a couple more transport missions, then go to SECTION A04
SECTION A20
this section is one segment of "how to do a combat mission", which starts at SECTION A04
- you've just arrived at the combat location
- You might find the combat arena confusing and overwhelming. Just remember that when you're in your beginner ship you have basically nothing to lose. If you get destroyed, you get another ship and you can try again
- press "[" to set throttle to 50%
- press U so that you see "seeker missile" to the right of the HUD
- 1
- press Q,E to select "contacts"
- the top vessel should be highlighted
- spacebar
- backspace
- now you'll see the details of the target in the bottom left
- if it says "mission target" then its the one you want to kill
- if it doesn't, target another ship in the same way until you find the mission target
- now you'll see the target in your central radar looking like this (triangle in angle brackets)

- using the mouse, or A, D, num5, num8, turn your ship to point at the target
- keep your ship pointed at the target, and press and hold the left mouse button
- it takes a while for the first missiles to fire, but they will keep firing if you stay pointed towards the target with the button held down
- if your missiles don't start firing, pay attention to the sounds made when you point at the target - in this video at about the 0:06 mark, you'll hear a series of 11 or 12 beeps, starting slow then speeding up - that's what you should hear if you are holding your finger on the LMB and keep aimed straight at the target for long enough
- you'll also see in the video that once you are attacking, or are being attacked, the target will look like this

- quite often I seem to lose target lock. You need to re-lock to be able to fire weapons. If you can see the ship, turn your ship towards it until you see an orange box around it

- then press T
- (when nothing is targeted you'll see the name of your current star system in the bottom left - when you have a target, you'll see the name of the pilot and the ship)
- so if you run out of ammo without destroying the target, its time to run
- go to SECTION A18
- if you get destroyed, go to SECTION A13
- so you've destroyed the target
- make a note, if when the target was destroyed, a message came up in the top right about "bounty claim awarded"
- now you need to check if the mission had more than one target
- 1
- press Q,E to select "transactions"
- up, down arrows to highlight "all transactions"
- right arrow to highlight the mission
- spacebar
- this screen will either show "reward options" or "kills confirmed"
- if there are still targets remaining (ie. not displaying "reward options", press "U" and then go back to the start of SECTION A20
- otherwise, it's time to collect our reward
- press "U"
- 1
- select "transactions"
- arrow keys to highlight mission
- spacebar
- arrow keys to highlight galaxy map
- spacebar
- (now using mouse)
- click and hold on the system (white dot) that is marked with a double blue circle
- backspace until you are back in the cockpit
- J
- turn ship to point at target
- max throttle
- (then after jumping)
- continue jumping to the next target until you don't have a target
- 1
- arrow keys to highlight "set filters"
- remove any ticks and tick "stations"
- backspace
- arrow keys to highlight the blue text
- spacebar
- select "supercruise assist"
- turn ship towards the target, being careful to avoid getting too close to the star
- supercruise will take you to the station
- dock with the station
- refuel, repair and restock ammo
- starport services
- using mouse - mission board
- mission board
- completed missions
- click on the completed mission
- click on the leftmost reward
- backspace until you're back in the cockpit
- if you earned a bounty:
- starport services
- using mouse - contacts
- administrative contact
- bounty vouchers
- "redeem all bounty vouchers"
- backspace until you're back in the cockpit
- so if you currently only have one missile rack, my recommendation is that if you have say 100,000 credits or more, you now buy a second missile rack - go to SECTION A06
- if you don't have that much money, do more combat missions until you do - go to SECTION A07
- if you have two missile racks then you could either continue accumulating money, or go looking online for other ideas - I intend to extend this guide at some point to cover purchasing and equipping a more capable combat ship - about 10 million credits should cover that. Please use the contact form at the bottom of the page to let me know if this interests you.
Thank you very much for being one of the first to use my guide. I really do appreciate you doing so! I hope you continue to enjoy flying in the Elite Dangerous universe
SECTION B01
In this section I will give instructions based on my own keybindings. See SECTION B04 for a reference to what each key represents
So you are close to a star, and jumping to the next star system will take you closer to it
- here is what to do
-
Press X to minimise your speed
-
Using A, D, num5, num8 turn your ship away from the star (so it’s no longer on your screen)
-
if your speed is at zero, press K
-
hold down W to set your throttle to maximum
-
wait until your speed is at least 4.00c
-
Now continue with your mission
SECTION B02
In this section I will give instructions based on my own keybindings. See SECTION B04 for a reference to what each key represents
So you are close to a star, you have supercruise-assist enabled, and travelling to your target will possibly take you dangerously close to the star - here is what to do
-
turn so that the local star is not visible on your screen
-
hold down W to set your throttle to maximum
-
wait until your speed is at least 4.00c
-
point your ship at your target and let the supercruise-assist module take over
-
Now continue with your mission
SECTION B03
In this section I will give instructions based on my own keybindings. See SECTION B04 for a reference to what each key represents
One thing that I missed the first time I did the first official tutorial, is the compass which is to the top left of the central radar
So when you have something targeted (a ship, space station, planet, star, etc) the targeted object is represented by a dot on this compass. If it’s a solid white dot, the object is more in front of you.

If it’s a hollow dot, the object is more behind you.

Get the solid white dot to the centre of the cross hairs, then you’re aimed straight at it.
The quickest way to change direction is using a combination of A (roll left) D (roll right) numpad-8 (pitch up) numpad-5 (pitch down)
Now continue with your mission
SECTION B04
KEYBINDINGS
My custom settings:
Esc - options - controls - ship controls - flight misc - supercruise = K
Controls - ship controls - flight rotation:
-
Roll left = A
-
Roll right = D
-
Pitch up = numberpad 8
-
Pitch down = numberpad 5
-
Yaw left = numberpad 4
-
Yaw right = numberpad 6
Controls - ship controls - flight throttle
-
Set speed to 50% = [
-
Set speed to 75% = ]
Controls - ship controls - miscellaneous - night vision = End
And default keybindings that I use:
"1" - external interface panel
"2" - upper left interface panel
"3" - lower interface panel
"4" - right hand interface panel
"E" - next panel tab
"Q" - previous panel tab
SECTION B05
How to adjust your "pips" so that your ship performs better in combat
- these are the pips

- if you want to know all about them, you'll find in-depth discussion in various forums on steamcommunity, frontier forums and reddit
- I'll keep it very simple (mostly because I know very little about them)
- the 4 dots above each of SYS, ENG, and WEP represents the priority you are assigning to each
- SYS (systems) represents shield regeneration speed, and also resistance of the shields to damage
- ENG (engines) represents your maximum speed (when you are out of supercruise), and also since your ship's speed affects your turn radius, as you assign more pips to ENG, for a given speed your turn radius will be smaller
- WEP (weapons) increases your weapon cooling capacity. ie. reduces overheating, so you can fire more times in rapid succession before you have to wait for the weapon to cool down
- you can adjust the pips like this
- pressing down arrow sets them to 2 pips each
- right arrow increases WEP and decreases the other 2
- up arrow increases ENG and decreases the other 2
- left arrow increases SYS and decreases the other 2
- the simplest strategy at this level is to set WEP to maximum - that way your missiles will fire as rapidly as possible - if you find that you get killed too easily, try putting a pip or two on SYS to improve your shields at the expense of slower missile firing
Now continue with your mission
SECTION B06
This is an explanation of how to read the throttle display. This position of this horizontal line represents your throttle level (this isn't the same as your speed - after setting your throttle level there is a delay while your speed adjusts to match)

- if you are in supercruise, maximum throttle look like the above image, in that the horizontal line is level with the top of the blue section
- below is what minimum or zero throttle looks like, whether you are in supercruise or not

- and this is what maximum throttle looks like when you are not in supercruise

- now continue with your mission
SECTION B07
In this section I will give instructions based on my own keybindings. See SECTION B04 for a reference to what each key represents
These are the settings required for Supercruise Assist to work
- press 4
- use Q / E to highlight the "modules" tab
- use up / down arrows to highlight "supercruise assist"
- if the [ ] brackets don't have a dot in them, press spacebar twice
- use Q / E to highlight the "ship" tab
- use up / down arrows to highlight "flight assistance"
- if "supercruise assist" is set to "manual throttle", use right arrow and down arrow to highlight this field, then press spacebar so that it is set to "auto throttle"
- press backspace until you are back in the cockpit
- now continue with your mission
SECTION E01
Most of this guide consists of text and screenshots. That's purely because that's what I look for first when I'm looking for a how-to. That way I can read it while I'm at work - and it's easy to consume a bit at a time, rather than needing to sit down and watch for a 10 to 15 minute block. Also this format makes it easier to come back to and use as a reference at a later date, using text search, or just scrolling through the page.
If this guide is actually useful to anyone, I'll put in the time to find YouTube tutorials made by others to insert in relevant parts of this tutorial.
Also I aim for maximum simplicity in my instructions, because I rarely have issues with other tutorials being too detailed, but often have issues with the tutorial author assuming I have knowledge that I don't have.
As well as being aimed at absolute beginners, this guide may also be useful for people (also like me) who jump between games a lot. I often come back to a game after 6 months, and have forgotten a lot of the key bindings and basic concepts.
WHO I AM
I was born in 1972 (51 yo at time of writing). I started gaming at about the age of 12; and I've always been crap (Apart from a couple of years at the start I've always gamed on a PC/Windows). I've given up on so many games that I thought looked great (at first glance) usually because I'm not a good problem solver, and I give up too easily. Maybe about 10 years ago I first tried blatantly cheating at games. The first one I remember was Half Life 2. I used a trainer app to give myself unlimited health, unlimited ammo. I still had a couple of frustrating moments - but I finished the game, and mostly I had a blast. Since then, most games I play I use a combination of save games and trainers to cheat my way through. There's a few games where I haven't had to do that, or wasn't able to do that , Red Dead Redemption 2, Biomutant, Knights of the Old Republic 1 & 2, Jade Empire, World of Warcraft, some of the Civilization series, and now, Elite Dangerous.
Nearly everyone will consider this guide far beneath them. Maybe everybody will. This guide is written for people like me who don’t or can’t pay enough attention in tutorials, who forget stuff quickly and frequently. But I think that Elite Dangerous is such a cool game, even these people deserve the chance to experience its awesomeness.